| Program Statistics | |||
|---|---|---|---|
| Stuntworks | TI-85 | ||
| Name | Gradebook | ||
| Version | 1.00 (build 980330d) | ||
| Released | 31 March 1998 | ||
| Author | Nathan Haines | ||
| Beta-testers | Alex Rivera | ||
| Files | Variable | Size | Type |
| GRADEBK | 4,087 bytes | PRGM | |
| CLASSNAM | 85 bytes | PRGM | |
| Classes | 73 bytes | STRNG | |
| Grades | 192 bytes (minimum) | MATRX | |
| GradeIDX | 74 bytes | LIST | |
Thank you for using Gradebook v1.00 for the TI-85 graphing calculator. This is the result of several hours' worth of programming and several weeks' worth of beta-testing with real data, and all care has been made to ensure that this program is a quality product and bug-free.
This documentation will use screenshots of the program with sample data to guide you through the process of using the program and will explain the way the intuitive interface works. This guide is designed so that you can follow the steps on your calculator while you read.
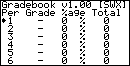
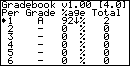
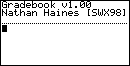
This is the main screen of the program, which is after the title screen when you first run GRADEBK. This will tell you your current grades for all classes, along with the number of assignments in each period, and the percentage grade for that period, and your total Grade Point Average, or GPA. You are limited to a maximum of six periods, but you do not need to fill out data for all of them. Any blank periods (or periods with a grade of less than 1%) will not be counted toward your GPA.
The first thing you should do, however, is assign a name to each of your classes. This function could not be integrated into the program, due to the limitations of TI-BASIC, unfortunately, but the program CLASSNAM is included to simplify this naming process.
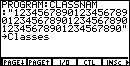
Each class can have a 10-character name. This can consist of any character, but must be padded out to 10 characters with spaces. That means that for each extra character that you don't use, you should replace it with a space. Simply type over each string "1234567890" with the name of your class. For example, if you wanted to name your first class "English," then you would have a string "English890." Type a space over the trailing "890."
To demonstrate how these string appear, we have left the string Classes in its default state so as to demonstrate how a class name appears, and how it is formatted on the screen. Once you have defined your class names to your satisfaction, run the program CLASSNAM and then restart GRADEBK. When you get to the main screen again, press either 2ND or ENTER to begin editing period 1. The following screen will appear on your calculator.
This is the assignment editor. From here you can view and modify existing assignments, as well create new ones. F1 and F2 scroll backward and forward through the assignments, as indicated by the direction of the arrow. F3 will allow you to edit or delete the current assignment, and F4 will allow you to create a new assignment at the end of the list. F5 will return you to the main screen.
To create a new assignment, you can either press EDIT or NEW. These two interfaces are identical and function in the same way. Gradebook is sophisticated and will handle such things appropriately if you do not actually have any assignments defined (for the same reasons, you can delete assignment 1 as much as you like, the number of assignments will never drop below zero, nor will this crash the program or corrupt your data).
Press F4 right now and create a new assignment. You will see the following screen.
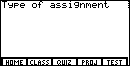
Giving names or titles to each assignment would have been impractical due to the increase of program size, memory usage, and the degraded performance. However, to allow you to identify each assignment, you can specify one of five categories for each assignment:
These classifications are only to remind you what each assignment is, and are not used in calculating grades. For now, press F1 to create a homework assignment.
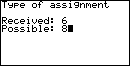
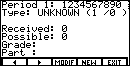
Next, you can specify the number of points you received and the number of points possible to receive on this assignment.
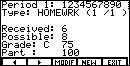
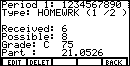
After you enter the number of points possible, you are returned to the assignment editor. It displays the numbers you just entered, as well as the letter and percentage grades for the assignment. Another, important datum is the number after "Part:." This number is the percentage that this assignment's grade counts toward the entire period's grade. As this is the only assignment defined, it accounts for 100% of the period grade listed on the main screen.
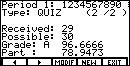
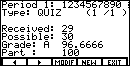
Press F4 and create an assignment with the following attributes: you scored 29 points on a quiz that was worth 30 points. Once you do this, you will see the next screen.
Now press EXIT to return to the main screen.
The main screen now displays the GPA, as well as the aggregate letter and percentage grades for period 1. You can see that there are a total of 2 assignments defined.
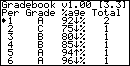
To show an example of what the program might look like in real use, sample data was entered to produce the above image. Enter period 1 again and press F3 to bring up the modifying options.
You can either edit or delete the current assignment. Editing the assignment is identical to creating a new assignment and is not discussed here. Deleting an assignment is simple. It clears the current assignment and shifts all following assignments to the left. Press F2 to delete this homework assignment.
As you can see, the quiz is now assignment 1 out of 1 total, and constitutes 100% of the entire class grade. The homework assignment has been deleted.
NOTE: The matrix, Grades, which is used to store assignment data is automatically redimensioned when an assignment is deleted to take up as little memory as possible.
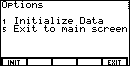
From the main screen, you can press MORE to bring up the options screen. From here you can erase all of the data you have entered for all of your classes. Press F1 now to erase the program's data.

The above screen displays, asking you to confirm that you want to reset all of the program's data, similar to the TI-85's memory reset confirmation screen. Pressing F5 will return to the options screen. Pressing F4, however, will reset all of your data. For now, press F4. You are now ready to start entering your own data! Good luck, and keep those grades up!
Tips and tricks: